Recording great footage is only part of the content creation process. Once cameras stop rolling, many creators face a different challenge: finding clips, managing assets, and keeping projects organized. A cluttered collection of files can slow editing, increase mistakes, and even lead to permanently lost work.
Many beginners assume file organization is something to worry about only after growing a large channel or working with clients. In reality, developing a simple system from the beginning saves time on every project, whether you’re editing short videos for social media or producing long-form content.
Good organization isn’t about creating dozens of complicated folders or following strict rules. Instead, it’s about making every file easy to locate, every project easy to understand, and every editing session more productive. When your workflow is organized, you spend less time searching for footage and more time creating content that matters.
This guide explains practical methods used by experienced creators to organize video files, manage projects efficiently, and reduce editing frustration without requiring expensive software or advanced technical knowledge.
Why File Organization Matters More Than Most Creators Realize
Many creators underestimate how much time is lost simply searching for files.
Imagine opening your editing software and seeing folders named
- Final Video
- Final Video New
- Final Version 2
- Edited Final
- Really Final
- Final Final
Finding the correct version quickly becomes confusing.
The same happens with raw footage scattered across different drives, downloaded music mixed with project files, and graphics saved in unrelated folders.
Poor organization often leads to the following:
- Editing delays
- Duplicate files consuming storage
- Missing footage
- Accidentally deleting important assets
- Using outdated versions
- Difficulty collaborating with others
- Stress during tight deadlines
By comparison, a structured workflow allows you to know exactly where every asset belongs before editing even begins.
Instead of asking, “Where did I save that clip?” you immediately know where to look.
Common Organization Mistakes That Slow Down Editing
Before building a better system, it helps to recognize habits that create unnecessary problems.
Saving Everything to the Desktop
The desktop often becomes temporary storage that slowly turns into permanent storage.
Screenshots, downloads, exported videos, project files, thumbnails, audio clips, and graphics all compete for attention.
Eventually, locating a specific file becomes frustrating.
A desktop should remain a temporary workspace rather than your primary filing system.
Mixing Multiple Projects Together
Some creators keep every recording inside one large folder.
For example:
Videos
    Camera Clips
    Audio
    Music
After several months, hundreds of unrelated files become impossible to identify.
Each project deserves its own dedicated workspace.
Using Vague File Names
Names like:
- Clip 1
- Video 2
- New Recording
- Test
- Export
provide almost no useful information.
Months later, these filenames become meaningless.
Storing Assets in Random Locations
Downloading music into Downloads, saving graphics on the desktop, storing project files on another drive, and exporting videos elsewhere creates unnecessary confusion.
Keeping related files together dramatically improves efficiency.
Build a Consistent Folder Structure
One of the simplest improvements is creating the same folder layout for every project.
Consistency matters more than complexity.
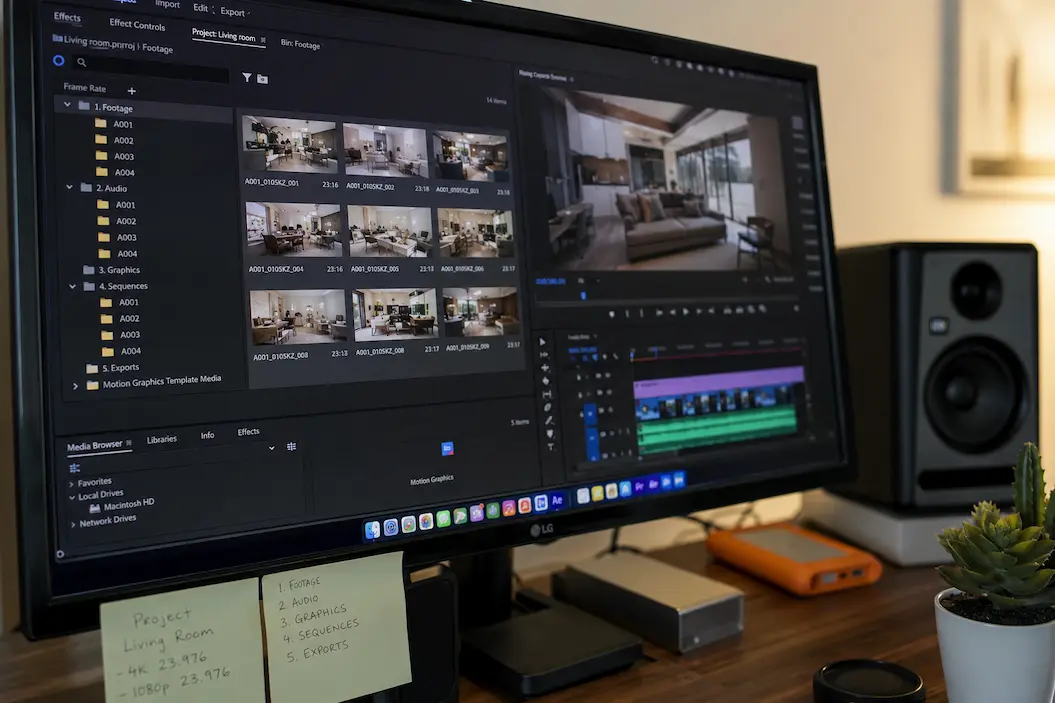
A straightforward structure could look like this:
| Folder | Purpose |
|---|---|
| Raw Footage | Original camera recordings |
| Audio | Voiceovers, music, sound effects |
| Images & Graphics | Logos, overlays, screenshots |
| Project Files | Editing software files |
| Exports | Finished videos |
| Thumbnails | Thumbnail images |
| Documents | Scripts, outlines, notes |
| Backup | Important duplicate files |
Every new project starts with the same foundation.
Eventually, opening any project feels familiar because everything is in its expected place.
Organize Projects by Date and Name
Instead of placing every project into one giant folder, separate them logically.
For example:
2026
    July
        Camera Review
        Streaming Setup Guide
        Lighting Tutorial
Or:
Content Projects
    Product Reviews
    Tutorials
    Livestream Highlights
Some creators prefer organizing by upload date, while others organize by content type.
Both methods work well as long as they’re used consistently.
Create Meaningful File Names
Good filenames answer basic questions without opening the file.
Instead of:
IMG_5482.mp4
Rename it to
Desk_Setup_BRoll_Wide.mp4
Rather than
Recording1.wav
consider:
Voiceover_Intro.wav
Useful filenames often include:
- Project name
- Scene or subject
- Camera angle
- Version number
- Date (if helpful)
Examples include:
Podcast_Intro_Take2.wav

Gaming_Setup_CloseUp.mp4

Lighting_Test_LeftSide.mp4

Thumbnail_Version03.psd
Clear names reduce guesswork, especially months after recording.
Keep Raw Footage Separate From Edited Files
One common mistake is editing directly inside folders containing original recordings.
Instead, think of raw footage as your master archive.
Original recordings should remain untouched whenever possible.
Your editing software references these files while all edits remain inside the project file itself.
This separation makes it easier to:
- Recover mistakes
- Re-edit old videos
- Create new versions
- Replace music
- Update graphics
Without risking damage to the original recordings.
Store Project Files Alongside Related Assets
Most editing software creates project files that reference your media instead of containing the actual video.
If you move footage after editing has begun, many editors display missing file errors.
A simple solution is keeping everything connected.
For example:
Streaming Guide
│
├── Raw Footage
├── Audio
├── Graphics
├── Project Files
├── Exports
└── Thumbnails
Avoid moving files to different drives after starting a project unless you move the entire folder together.
This keeps file paths intact and prevents unnecessary troubleshooting later.
Separate Working Files From Finished Exports
During editing, you might export several versions:
- Draft
- Client Review
- Final
- Social Media Version
- YouTube Version
- Vertical Version
Mixing these with raw footage quickly becomes confusing.
Instead, create a dedicated Exports folder.
Within it, consider organizing versions clearly:
Exports

Draft

Final

Shorts

Archive
This structure prevents accidentally uploading unfinished versions while making it easier to revisit older exports if needed.
Build a Simple Asset Library for Reusable Content
Not every file belongs inside a single project.
Many creators regularly reuse certain assets across multiple videos, such as:
- Logo animations
- Intro sequences
- Outro templates
- Lower-thirds
- Sound effects
- Background music
- Brand fonts
- Color overlays
- Motion graphics
Instead of copying these into every project folder, maintain a separate asset library.
A simple example might look like this:
Asset Library
│
├── Brand Logos
├── Intro Videos
├── Outro Screens
├── Sound Effects
├── Music
├── Fonts
├── Motion Graphics
└── Thumbnail Templates
Keeping reusable assets in one central location saves storage space and ensures you’re always using the latest version.
Use Color Labels, Ratings, and Collections When Available
Many editing applications allow clips to be marked with colors, stars, tags, or labels.
Rather than relying only on folder names, use these tools to organize footage inside the editing software.
For example:
| Label | Purpose |
|---|---|
| Green | Approved clips |
| Yellow | Needs review |
| Red | Poor-quality footage |
| Blue | B-roll |
| Purple | Audio-only clips |
Similarly, star ratings can help identify your strongest takes during long recording sessions.
Instead of reviewing every clip again, you can immediately locate the footage you’ve already identified as the best.
Great idea. Below is Part 2 in a natural, paragraph-based style, continuing seamlessly from Part 1. It avoids the repetitive “tip list” structure and instead reads like a well-researched, human-written article.
Managing Projects Across Multiple Cameras and Devices
Modern content creation rarely happens on a single device. You might record your main footage with a camera, capture behind-the-scenes clips on your phone, record audio with an external recorder, and download graphics or music from several different sources. While this flexibility improves production quality, it also creates more opportunities for you don’t organize filesn’t organized from the beginning.
Instead of combining everything into one folder right away, create separate folders for each source before importing them into your editing software. A folder for Camera A, another for smartphone footage, one for audio recordings, and another for screen captures makes it much easier to identify where every asset came from. This becomes especially valuable when syncing footage or replacing clips later in the editing process.
Keeping source files separate doesn’t mean they stay disconnected forever. Once imported into your editing software, they work together as one project, but maintaining that original structure gives you a reliable reference whenever something needs to be located again.
Make Storage Planning Part of Your Workflow
Running out of storage space in the middle of a project is frustrating, but it is also preventable. Many creators focus on buying cameras and microphones while overlooking how quickly video files accumulate. High-resolution recordings, multiple takes, proxy files, exports, and backups can consume hundreds of gigabytes before a single video is published.
Rather than filling every drive until it reaches capacity, leave free space available. Storage devices generally perform more efficiently when they are not completely full, and having extra capacity reduces the need to constantly move projects between drives.
It is also helpful to think of storage in layers. Active projects can remain on your fastest drive for smooth editing, while completed projects can be moved to larger archive drives. This approach keeps your editing environment responsive without requiring expensive upgrades every few months.
Develop a Reliable Backup Routine
Even experienced creators occasionally lose footage because of accidental deletion, hardware failure, or corrupted storage devices. While no backup system guarantees absolute protection, maintaining multiple copies of important files dramatically reduces the chances of permanent loss.
A practical habit is keeping your original recordings untouched while creating at least one additional backup before beginning major edits. Some creators use an external drive, while others combine local storage with cloud backup services. The specific method matters less than consistently following the same routine after every recording session.
Backups should also be verified from time to time. Simply copying files isn’t enough if the backup itself becomes damaged or incomplete. Opening a few files occasionally confirms that everything remains accessible when you actually need it.
Avoid Creating Endless Versions of the Same Project
One common source of confusion appears near the end of the editing process. Files begin multiplying with names like “Final,” “Final New,” “Latest Final,” and “Final Version 7. ” After several revisions, it becomes surprisingly difficult to determine which file should actually be published.
A more structured versioning system removes this uncertainty. Adding simple version numbers, such as V01, V02, or V03, creates a clear editing history while making collaboration easier if other people review your work. Once the project is complete, rename the approved export with a descriptive title rather than another variation of “final.”
This small habit prevents unnecessary mistakes and helps you return to previous edits if needed without guessing which file contains the correct changes.
Keep Downloads Under Control
Downloads often become one of the most overlooked sources of digital clutter. Music tracks, stock footage, graphics, fonts, overlays, templates, and screenshots all accumulate over time, filling the Downloads folder with hundreds of unrelated files.
Instead of leaving downloaded assets where they were originally saved, move them into their proper project folder or a dedicated asset library as soon as they are approved for use. This simple routine keeps your Downloads folder temporary rather than permanent and makes future projects much easier to manage.
You’ll also spend less time downloading the same files repeatedly because you’ll already know exactly where they are stored.
Create a Workflow That Starts Before Editing
Efficient editing begins long before opening your editing software. A consistent workflow starts immediately after recording by transferring footage, organizing folders, checking that all files copied successfully, and creating backups before making any edits.
From there, importing footage into the editor becomes straightforward because everything already has a logical place. Graphics, music, voiceovers, and scripts are simple to locate, allowing you to focus on creative decisions instead of file management.
Many experienced creators follow nearly the same sequence for every project, regardless of whether they produce one video each month or several every week. Consistency reduces mental effort because the process becomes familiar over time.
Archive Finished Projects Instead of Deleting Them
After publishing a video, it can be tempting to delete everything and recover storage space. However, completed projects often remain valuable long after publication.
Older footage can be repurposed for future videos, social media clips, promotional material, or updated tutorials. Original project files also allow corrections if a mistake is discovered after publishing or if platform requirements change.
Rather than deleting completed work immediately, move finished projects into a clearly labeled archive. Organizing archived projects by year or content category makes them easy to revisit without cluttering your active workspace.
Small Habits That Save Hours Over Time
Productivity often improves through small, repeatable habits rather than dramatic changes. Renaming files immediately after importing them, deleting unusable clips before editing begins, and returning reusable assets to your library after each project all reduce clutter over time.
Likewise, spending five minutes organizing a project before editing can easily save an hour later when searching for missing assets or correcting avoidable mistakes. These habits may feel unnecessary during small projects, but they become invaluable as your content library continues to grow.
The goal is not perfection. The goal is to create a system that remains understandable even six months after you complete a project.
When Should You Change Your Organization System?
Many creators constantly redesign their folder structures, hoping to discover the “perfect” workflow. In reality, frequent changes often create more confusion than the original problem.
An organization system only needs to accomplish three things: help you find files quickly, support your editing process, and remain consistent across future projects. If those goals are being met, there is little reason to rebuild everything from scratch.
Improvements should happen gradually as your needs evolve. Perhaps you begin adding separate folders for client work, create a larger asset library, or archive projects differently as your content expands. Small adjustments are easier to maintain than complete overhauls.
Conclusion
Organizing video files is not the most exciting part of content creation, yet it has a direct impact on editing speed, project quality, and long-term productivity. Every minute you spend searching for footage, reconnecting missing files, or recovering lost assets is time you could invest in creating better content.
A thoughtful organization system doesn’t need to be complicated. Clear folder structures, descriptive filenames, reliable backups, and consistent workflows create an environment where projects remain manageable regardless of their size. As your content library grows, these habits become even more valuable because they eliminate unnecessary friction from the creative process.
Instead of treating file organization as an occasional cleanup task, make it part of every project from the moment recording begins. Over time, you’ll spend less energy managing files and more energy developing ideas, improving your editing skills, and publishing content with confidence.
FAQs
How often should I organize my video files?
The best approach is to organize files immediately after every recording session. Waiting until multiple projects accumulate usually makes the task more difficult and increases the risk of misplaced files.
Is cloud storage enough for video backups?
Cloud storage provides an additional layer of protection, but many creators combine it with local backups for faster access and greater reliability, especially when working with large video files.
Should I keep raw footage after publishing a video?
If storage allows, keeping original recordings is generally worthwhile. Raw footage can be reused for future projects, revised edits, or new content formats without needing to record everything again.
What is the biggest mistake beginners make?
One of the most common mistakes is using inconsistent folder structures and vague filenames. As projects accumulate, finding specific assets becomes increasingly time-consuming, slowing down the entire editing workflow.
Can effective file organization really improve editing speed?
Yes. While organization doesn’t directly make editing software faster, it significantly reduces the time spent searching for files, reconnecting missing media, managing versions, and recovering misplaced assets. Over dozens of projects, those saved minutes add up to many hours of productive editing time.

Riley Bennett writes about content creation, streaming gear, and building efficient creator workflows at estergamer.com. After spending years testing equipment and figuring out what actually works versus what just looks impressive, Riley focuses on practical, no-nonsense advice for beginners starting from scratch. When not writing, Riley enjoys exploring new tech, refining home studio setups, and helping fellow creators skip the expensive mistakes that slow most people down. The goal is simple: honest guidance that gets real results without the marketing fluff.